
Restore files and folders
What it's for
Use this when a client needs files or folders back: a deleted spreadsheet, an overwritten folder, or last Tuesday's version of a document. You can run the restore from the backup app on the device, or remotely from the Web Portal without touching the client's machine.
This article covers File and Folder backups. For other backup types, see Office 365 - Restore and Disk Image - Walkthrough.
Note: Partners can white-label the backup app and the Web Portal, so window titles and product names may show your own brand instead of the names used here.
Before you start
- Know what you're after: which files or folders, which device they came from, and roughly when they were last good.
- Make sure there's room on the destination disk for the restored files.
- For a remote restore from the Web Portal: the device must be online, meaning the backup app is running and connected. To browse file names remotely, the client's Allow administrator to view file names setting must be turned on. If the client turned it off, you can't turn it back on from the portal. Restore from the backup app on the device instead.
- Restoring to a different computer? Sign in to the backup app on that device with the client's user account, then follow Restore a Protected Item from a different device.
Steps
Warning: If you restore to the original location with Overwrite existing files: set to Always, the restore replaces the client's current files with the backup copies, and any changes made since that backup are lost. If you're not sure, restore to a new folder instead.
Option A: Restore from the backup app
- Open the backup app on the client's device (on site or through your remote access tool) and click Restore.
- Under Please select a Storage Vault to restore from:, pick the vault that holds the backup, then click Next.
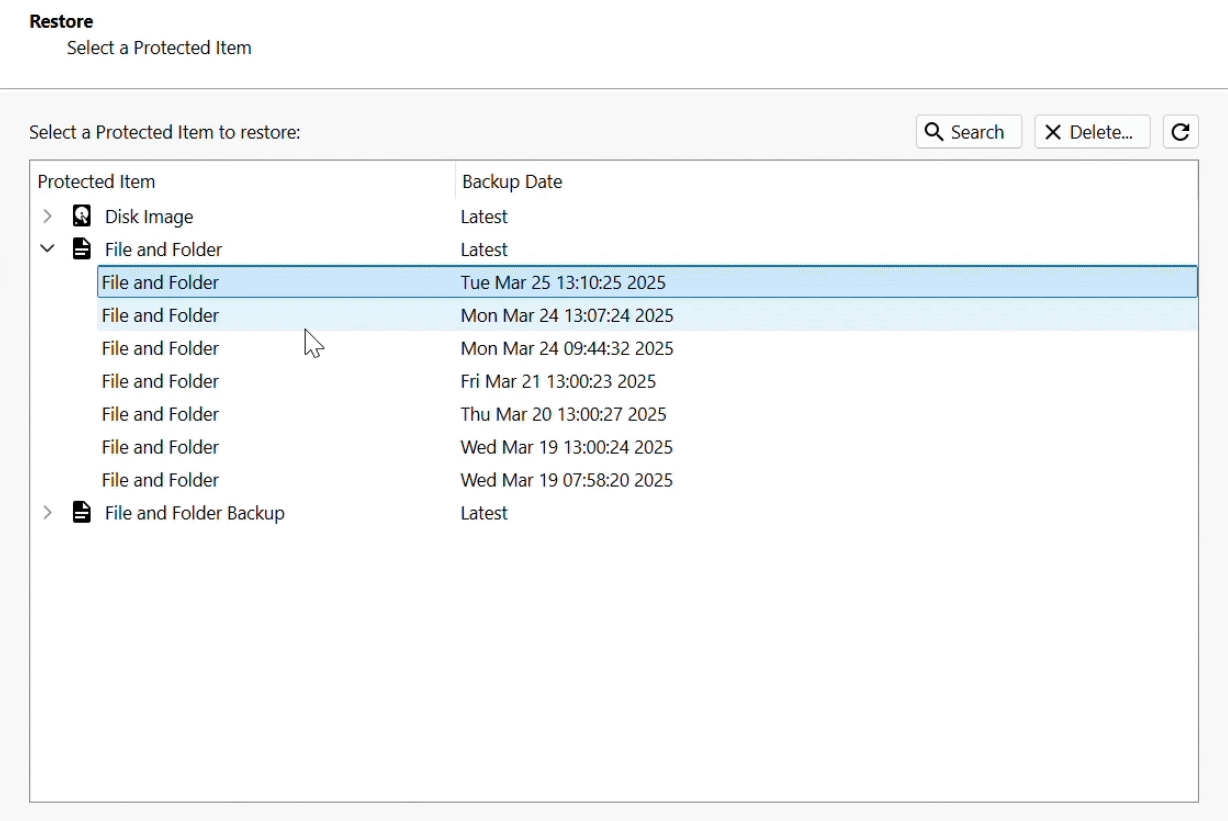
- Under Select a Protected Item to restore:, find the Protected Item. By default, the Backup Date column shows Latest, which is the most recent backup.
-
To restore an older version, click the arrow next to the Protected Item to expand it. Then pick the snapshot by its backup date and time. To find a file when you don't know which snapshot it's in, use Search.
-
Click Next. Under Select a restore method, choose Files and Folders to restore normal files, or Compressed archive file (zip / tar) to get one archive file instead. Tick Show advanced options to see more methods, such as a test restore.
- Choose All items, or choose Select items... and tick only the files and folders you need. Click Next.
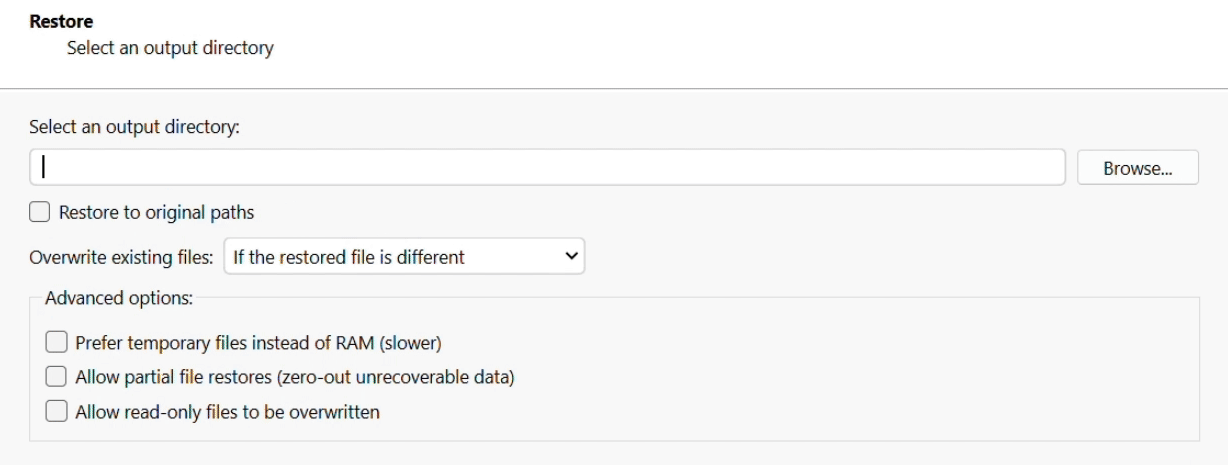
- Choose where the files go:
- Tick Restore to original paths to put files back where they came from, or
- Click Browse... and pick a different folder. We usually restore to a new folder first, so the client can compare before anything gets replaced.
-
Set Overwrite existing files: (the choices are explained below), then click Next to start the restore.
Option B: Restore remotely from the Web Portal
Use this when you can't get to the machine, or for Linux devices, where the backup app runs as a background service and you manage restores from the Web Portal.
- In the Web Portal, go to Management Console > Users > [user] > Devices. You can also find the device on the Management Console > Devices page.
- Find the device you want to restore to. It must show as Online.
- Click Actions... on the device's row (on the Devices page, the button in the Actions column is called Actions). The Connected Device Actions dialog opens.
- On the Device tab, click Restore.... The restore wizard opens.
-
Under Please select a Storage Vault to restore from:, pick the vault that holds the backup, then click Next >.

-
Under Select a Protected Item to restore:, expand the device and then the Protected Item. Each backup is listed as a snapshot with its date and time, for example "Snapshot 2026-09-26 00:04:00". Pick the snapshot you want. To find a file when you don't know which snapshot it's in, use Search. Click Next >.

-
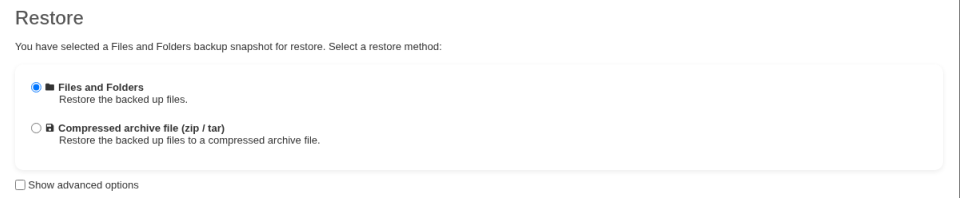
Choose the restore method: Files and Folders or Compressed archive file (zip / tar). Tick Show advanced options to see more methods. Click Next >.
-
Choose All items, or choose Select items... and tick only the files and folders you need. Click Next >.
- Choose where the files go on the device:
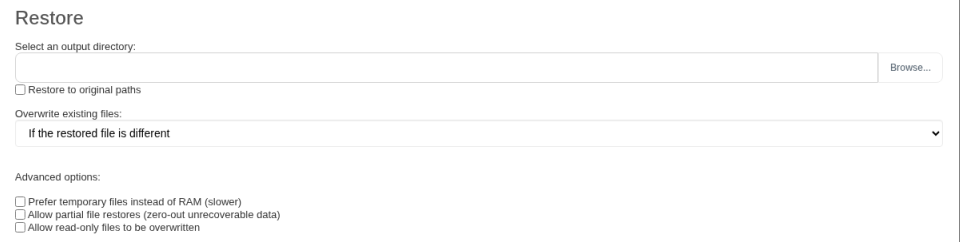
- Under Select an output directory:, type a folder path or click Browse... to pick one. We usually restore to a new folder first, so the client can compare before anything gets replaced.
- Or tick Restore to original paths to put files back where they came from.
-
Set Overwrite existing files:. It starts on If the restored file is different. Tick any Advanced options: you need (all the choices are explained below).
-
Click Restore. The restore runs on the device, just as if you'd started it in the backup app.
Restore options explained
Restore methods
- Files and Folders: restores the selected files to a folder on the device. This is the one you'll use most.
- Compressed archive file (zip / tar): writes everything into a single archive instead. The choices are zip, tar, tar.gz, tar.zst and sqfs. This uses less disk space and is handy for large, highly compressible files or for handing a client a bundle of files.
- Simulate restore only (under advanced options): downloads and rebuilds the files but doesn't save them. Use it to test that a restore would work. See Run a test restore.
Overwrite existing files: (the same four choices in the backup app and the Web Portal; the Web Portal starts on If the restored file is different)
- If the restored file is different: replaces any existing file whose content differs from the backup copy.
- If the restored file is newer: replaces an existing file only if it has an older timestamp than the backup copy.
- Always: replaces every existing file.
- Never (skip existing files): leaves existing files alone and restores only the missing ones. This is the safest choice when you're restoring deleted files into a live folder.
Advanced options (leave these off unless you need them):
- Prefer temporary files instead of RAM (slower): for machines that are short on memory.
- Allow partial file restores (zero-out unrecoverable data): restores what it can from damaged data instead of failing. The unrecoverable parts are filled with zeros.
- Allow read-only files to be overwritten: lets the restore replace files marked read-only.
Restore to original paths is only available for File and Folder backups. For other types it's greyed out.
Run a test restore
A test restore checks that a client's backups can actually be restored. Run one from the Web Portal after you set up a new client, and then regularly, for example once a quarter.
- Start a restore from the Web Portal as in Option B above: open the device's Actions... dialog and click Restore....
- Pick the Storage Vault and a snapshot, then choose Files and Folders as the restore method. To test without writing any files, tick Show advanced options and choose Simulate restore only.
- Choose Select items... and tick a few files or folders to test.
- For a real test restore, enter a new, empty folder under Select an output directory:, so nothing on the device is overwritten.
- Click Restore.
How long it takes depends on how much data you restore, the device's internet speed and how well the files compress. When it's done, the job log shows whether the test restore succeeded or had errors. Find it under Job logs in the Web Portal or on the user's Job Logs tab.
Verify it worked
- If you restored from the backup app, watch the progress on the Backup tab, under the Protected Item you restored from. If you restored from another device's Protected Item, it shows as a temporary entry while it runs.
-
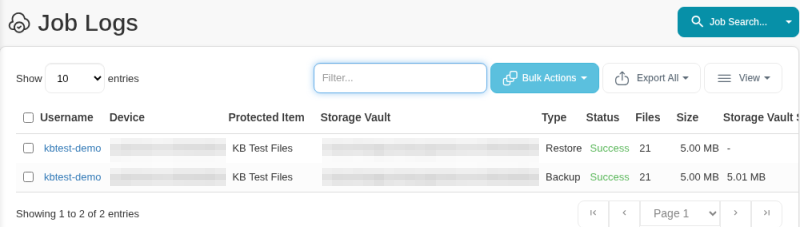
In the Web Portal, go to Management Console > Job logs (or the user's Job Logs tab). The restore shows as a row with Type Restore. Check that Status says Success and that the Files count and Size look right.
-
Click the job to open its report. It shows the file and folder counts, the total size and the log messages, so you can spot errors or skipped files.
- Open a few of the restored files, ideally with the client, to confirm they're the right versions.
Troubleshooting
- You can't find Restore... in the Web Portal: it's on the Device tab of the Connected Device Actions dialog, which opens from the device's Actions... button. The device must be online.
- The device doesn't show as online in the Web Portal: make sure the backup app is running and the machine has internet access. See Windows client only shows as 'Offline' in user-profile 'Devices' tab.
- You can't see file names when restoring remotely: the client has turned off Allow administrator to view file names. Run the restore from the backup app on the device.
- The Protected Item came from another device: in the backup app, tick Show items from other devices and click refresh. See Restore a Protected Item from a different device.
- The Protected Item was deleted: its backups stay in the vault until retention removes them. In the backup app, tick Show unknown items to list them.
- The version you need isn't there: retention may have removed it. See How to view older snapshots and check the vault's retention settings.
- Restoring into a Linux home folder: since version 26.7, these restores always run in a sandbox that keeps the restore's file writes isolated from the rest of the system. That's expected.
- Restoring on a Synology NAS (DSM 7): permissions and ownership may not be restored exactly. Check them after the restore.
- Still stuck? Email support@magnusbox.com with the user name, device name and job log.