
Set default Protected Items and schedules with policies
What it's for
Default Protected Items let a policy set up backups for you. When a device registers to a user on the policy, it automatically gets the Protected Items, schedules and Storage Vault you defined, so every new client machine is protected the same way without manual setup. Use this to standardize onboarding across your clients.
Before you start
- You need your admin account for the Magnus Box Web Portal.
- Decide which policy to change. Changing Default Policy affects every user on it. To try things out, create a new policy and apply it to one test user first.
- Know which operating systems the clients use. Each default Protected Item applies to one OS family (or any OS).
Warning: A default Protected Item is created on every device it applies to. Add-on types such as Disk Image are billed for each device that gets one. For current pricing, contact support@magnusbox.com.
Steps
1. Add a default Protected Item to a policy
- In the Web Portal, go to Management Console > User policies and click the policy, for example Default Policy. To start a new one, click Add Policy....
- Select the Protected Items tab and click the green + (Add default protected item...) button.
- In Specify Operating System, choose Apply to: Any operating system, Windows (Any), Windows (x86_32), Windows (x86_64), macOS or Linux.
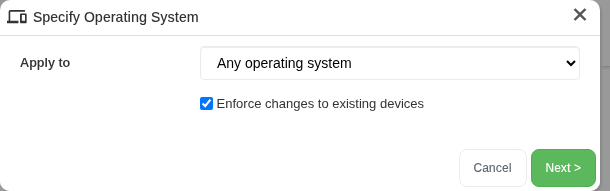
- Decide on Enforce changes to existing devices (see What Enforce changes to existing devices does), then click Next >.
- The Protected Item editor opens. Enter a Name:, choose the Type: (for example Files and Folders), and set up Items, Commands, Schedule and Retention as you would for a normal Protected Item. For file paths, use paths that exist on every device, such as
C:\Users. See Back up files and folders. - Click Save, then click Save Policy at the top right.
2. Provision a Storage Vault automatically
- In the same policy, select the Storage Vaults tab.
- Next to Automatically create Storage Vault for new devices, choose the Storage Template, for example Cloud Storage Vault. User controlled leaves it to each user account's own setting.
- Click Save Policy.
For how this affects which devices share a vault, see Isolated vs shared Storage Vaults.
3. Add default schedules (optional)
- Select the policy's Schedule tab and click + (Add default schedule...).
- Set up the schedule as usual. Instead of a specific vault, you can pick a rule such as the latest Storage Vault or all Storage Vaults, so it works for every user. See Backup schedules explained.
- Click Save Policy.
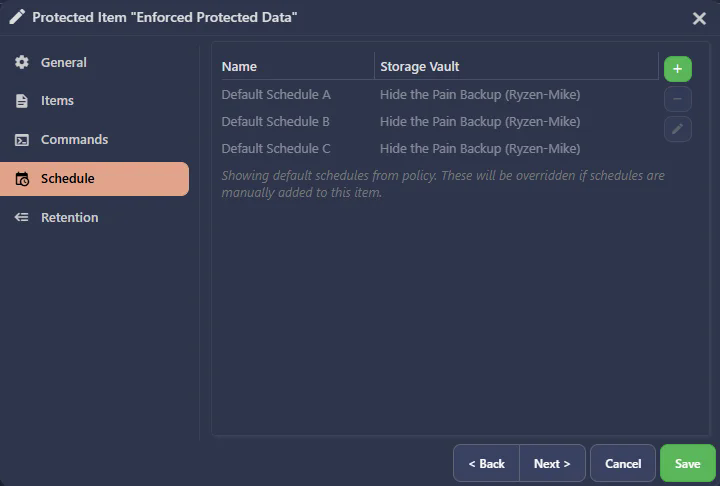
Default schedules are added to every new Protected Item, not to existing ones. Once added, a schedule belongs to the Protected Item, and you change it there. If a default Protected Item has its own schedule and the policy also has a default schedule, that item gets both, so avoid doubling up.
4. Apply the policy to users
- New users: choose the policy in Apply Policy: when you click Add user.... To make it the policy every new user gets, open the ... menu on its row on the User policies page and make it the default. A new default isn't applied to existing users.
- Existing users: open the user, select the Policies tab, choose the policy and click Save changes.
- Many users at once: put them in a user group and assign the policy to the group. See Group client accounts with User Groups.
What Enforce changes to existing devices does
- Ticked: the Protected Item is also added to devices that are already registered, and later changes you make to it in the policy are applied to those devices too.
- Not ticked: the Protected Item is only created on devices that register from now on. Devices that are already registered aren't changed.
Default Protected Items can only be edited in the shared policy, not in a user's custom policy.
Verify it worked
- Register a test device to a user on the policy (or, with enforcement on, open an existing user). The default Protected Item appears on the user's Protected Items tab for that device.
- Open the Protected Item and select Schedule. Schedules that come from the policy are shown greyed out.
- After the first scheduled time, check Job logs for a successful backup.
Troubleshooting
- The item didn't appear on an existing device: Enforce changes to existing devices was off, which only covers new devices. Edit the default Protected Item and tick it, or add the item to that device by hand.
- The item appeared on the wrong machines: check Apply to. Any operating system includes Macs and Linux servers.
- Backups fail with no files: a path in the default item doesn't exist on that device. Use paths common to all devices, or a separate default item per OS. See The backup job did not include any files.
- Two schedules on one item: the item has its own schedule and a policy default schedule. Remove one.