
Back up files and folders
What it's for
A Files and Folders Protected Item backs up the documents, folders and shares you pick on a client's device. It's the backup type you'll set up most often, and the one to use when a client mainly needs files back quickly. This article shows how to set one up from the Magnus Box Web Portal or from the Magnus Box Application on the device, how to use include and exclude filters, and what the snapshot and scan options do.
Note: Partners can white-label the backup app and the Web Portal, so window titles and product names may show your own brand instead of the names used here.
Before you start
- The backup app must be installed on the device and signed in to the client's user account, and the device must be Online in the Web Portal so you can browse its folders. See Supported platforms and system requirements.
- The client needs a Storage Vault. New user accounts usually get one automatically. See Isolated vs shared Storage Vaults.
- To browse file names remotely, the device's Allow administrator to view file names setting must be on.
- For a network share, it's better to install the backup app on the device that holds the data. If you back up a share from another computer, see Accessing Windows network shares and UNC paths.
Steps
1. Create the Protected Item
- In the Web Portal, go to Management Console > Users and click the client's user, for example
contoso-dental. - Select the Protected Items tab and click Add protected item.... The Protected Item editor opens on the General tab.
- In Name:, type a clear name, for example "CONTOSO-PC01 Documents".
- Under Type:, select Files and Folders, then click Next >.
2. Choose what to back up
- On the Items tab, click the folder button (Browse Device for items). The Select items to protect dialog shows the device's drives and folders with their sizes.
- Tick the folders or files to back up, for example
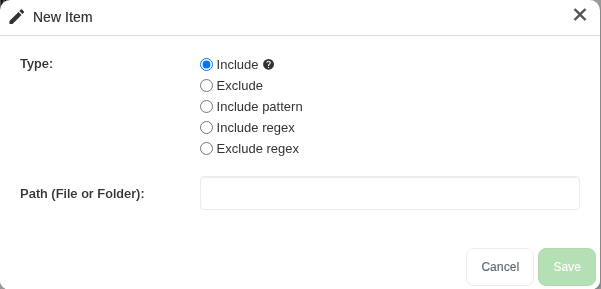
C:\Users, and click Save. Each selection appears in the list as an Include item. - To type a path instead, or to add a filter, click + (Add an item) and pick a Type: (see Include and exclude filters).
- Click Next >.
3. Add commands, a schedule and retention
- On the Commands tab, you can add commands to run before or after the backup. Most file backups don't need any. Click Next >.
- On the Schedule tab, click + (Add schedule), pick the Storage Vault and add a time. See Backup schedules explained.
- On the Retention tab, each Storage Vault shows (default), which means the vault's own retention rules apply. Leave it unless this data needs different rules. See Retention policies and retention passes.
- Click Save. The Protected Item appears on the Protected Items tab.
4. Run the first backup
- On the Protected Items tab, click Run Backup... on the new item's row.
- Pick the Storage Vault and start the job. The first backup uploads everything, so it takes the longest. Later backups only upload changes.
Set it up from the Magnus Box Application instead
If you're working on the client's device, for example during a remote session, you can create the same Protected Item in the Magnus Box Application. Protected Items are stored with the user's account, so an item created in the app shows up in the Web Portal, and the other way round.
- Open the Magnus Box Application on the device and sign in with the client's user account if it asks.
- Click + Add Protected Item, type a clear name and choose Files and Folders as the type. If Files and Folders isn't offered, a policy on the account has probably disabled it. Check the user's policy in the Web Portal.
- Click the + button to browse for the files and folders to back up. You can also drag files and folders into the window. The selection dialog shows an estimate of the selected size.
- Add any exclude filters you need (see Include and exclude filters), then work through the rest of the wizard to pick the Storage Vault, schedule and retention, just like in the Web Portal steps above.
- Save the Protected Item. To run the first backup straight away, choose to run it now at the end of the wizard, or start a backup from the app's Backup view.
Include and exclude filters
Use filters to back up only what matters and skip what doesn't, such as downloads, caches and video files. The New Item dialog offers five types:
- Include: a single file or folder path, for example
C:\Users\Public\Documents. - Exclude: a file name, folder name, path or wildcard to skip, for example
AppData,C:\Windowsor*.avi. It's checked against the full path of every file. - Include pattern: a Top Directory: plus a wildcard Path, for example top directory
C:\Users\with path*\Documentsto back up every user's Documents folder. - Include regex: a Top Directory: plus a regular expression, for example
C:\Users\with[^\\]+\\Documents. - Exclude regex: a regular expression checked against the full path, for example
.*\.(mp4|mkv|avi)$.
Wildcards in patterns: * matches any characters within one file or folder name, ** matches any number of folders, ? matches one character, and [0-9] matches one character from a set.
Regular expressions are case-sensitive unless you start them with (?i), and they match anywhere in the path unless you anchor them with ^ and $.
Warning: An invalid pattern or regular expression stops the backup job from running. After adding a filter, run a backup and check that it succeeds and that the file count looks right.
For exclusions that should apply to every client on a policy, use the policy's File and folder exclusions list instead. See Policy Settings and Magnus Box Exclusion List.
Back up every user's folder without %USERPROFILE%
Windows environment variables such as %USERPROFILE% or %APPDATA% don't work in backup paths. The backup app runs jobs as its own service account, so %USERPROFILE% would point to that account rather than to the person who uses the computer.
To back up the same folder for every user on a device instead:
- Add an Include pattern with top directory
C:\Users\and path*\Documents, or - Include all of
C:\Usersand exclude what you don't need, for example the Exclude patternC:\Users\**\Downloadsor the Exclude regex^C:\\Users\\[^\\]+\\Downloads.
Snapshot and scan options
- Take filesystem snapshot (Windows): uses a VSS snapshot so files that are open, such as Outlook data files or a QuickBooks company file, can be backed up, and so all files come from the same moment. It's on by default. Turn it off for items on a network share or on FAT or exFAT drives, where VSS isn't available. If snapshots fail, see Troubleshooting VSS.
- Always re-scan unchanged files: by default, a file with the same size and modified time as last time is skipped, which makes backups much faster. Tick this only for files that change without updating their modified time, such as some database files or encrypted containers.
- Back up extra system permissions and attributes (Windows): also saves full Windows permissions, hidden and system attributes and alternate data streams, and puts them back when you restore to a Windows device.
Some folders are always skipped, for example $RECYCLE.BIN, System Volume Information and pagefile.sys on Windows, and /proc, /sys and /dev on Linux.
Verify it worked
- Go to the user's Protected Items tab. Last backup job and Last successful backup job should show the new job with status Success.
- Click the job in Job Logs and check the Files and Size columns look right for what you selected.
- Run a quick test restore of one file. See Restore files and folders.
Troubleshooting
- The job fails with no files backed up: a path is wrong or a filter excludes everything. See The backup job did not include any files.
- "Access is denied" on some files: see Error "Access is denied" when backing up files and folders on Windows.
- Snapshot errors on Windows: see Troubleshooting VSS.
- Backups are slow: see Slow backup jobs.
Still stuck? Email support@magnusbox.com with the username, device name and the job's date and time.